Server side rendering React with Razzle
December 30, 2019 • 16 min read


Learn how to create server side rendering React app using Razzle with some practical best practices.
So, you've been using React for some time, maybe you use create-react-app to starting your project, or maybe you use your own webpack or parcel configuration to build an app using React. Time passed and you pretty happy about it.
Then everything changed when the Fire Nation attacked. Your colleague or maybe your team ask you about server-side rendering, they said “I heard that server-side rendering is really legit for performance, so it will much better for user experience and it's really good to improve SEO too”. Or maybe you're just curious enough how to improve your site performances and Stumbleupon server-side rendering, but you have no idea what it is or how to implement it.
What is server side rendering?
Before we discuss server-side rendering, let's take a step back and review how normally React render content (client-side rendering).
Here's the summary:
- Users go to our site.
- Our server receives a request, then gives a response immediately with the initial
HTMLdocument. And the document might be like this:
<!-- index.html -->
<!DOCTYPE html>
<html lang="en">
  <head>
    <meta charset="utf-8" />
    <meta name="viewport" content="width=device-width,initial-scale=1" />
    <meta http-equiv="X-UA-Compatible" content="IE=edge" />

    <title>React App</title>

    <link href="/static/css/main.d1b05096.chunk.css" rel="stylesheet" />
  </head>
  <body>
    <noscript>You need to enable JavaScript to run this app.</noscript>

    <div id="root"></div>
    <script src="/static/js/2.7a2f12fb.chunk.js"></script>
    <script src="/static/js/main.e2bdf7b7.chunk.js"></script>
  </body>
</html>- Browser receive that document, parse the HTML, then browsers see a
CSSand kinda say, “Ohh shooottt! I need to request this file”, so the browser makes a request to the server and pause the render process and waiting for the response. - Our server be like, I got another request, this user request
CSSfile, let me give the response again with theCSSfile that is requested. - Browser receive that
CSSfile and continue to render, while rendering, the browser seesJSfile and need to request again that file to the server, and be like, “Yoooo, I need thisJSfile, can you send it to me ?” and pause the render process again. - Copy that, sending you the
JSfile. - Browser then receive that file and continue to render.
- Until the browser finished load, parse and, execute all the
JS, finally, user sees some content.
Note: The browser rendering mechanism is much more complex than this.
Now, let's take a look at server-side rendering process:
- Users go to our site.
- Our server receives a request, then prepare/pre-populated/render initial
HTMLcontent or data (like user data or you fetch some data) on the server. After it finished, the server sends back the response, the document is problaly be like this:
<!DOCTYPE html>
<html lang="en">
  <head>
    <meta charset="utf-8" />
    <meta name="viewport" content="width=device-width, initial-scale=1" />
    <meta http-equiv="X-UA-Compatible" content="IE=edge" />

    <title>React App</title>

    <link rel="stylesheet" href="/static/css/bundle.9638be3a.css" />
  </head>
  <body>
    <noscript>You need to enable JavaScript to run this app.</noscript>

    <div id="root">
      <div class="App">        <div class="App-header">          <img            src="/static/media/react.9a28da9f.svg"            class="App-logo"            alt="logo"          />          <p>            Edit            <code>src/App.js</code>            and save to reload.          </p>          <a            className="App-link"            href="https://reactjs.org"            target="_blank"            rel="noopener noreferrer"          >            Learn React          </a>        </div>      </div>    </div>

    <script src="/static/js/bundle.01df4f0a.js"></script>
  </body>
</html>- Browser receive that document, parse it, but here's the difference, the user can already see the content, did you notice the response given by the server? Yup, content already there, not just some skeleton/placeholder about our app. At least now our site viewable but still not interactive to the users.
- The process not stop there, browsers continue to parse and see a
CSSandJSfile and make a request to the server just like the process above. After it finished ourjs/Reacttakes over and starts execute where the app left off and then it becomes interactive to the users.
Let's recap, so, what is server-side rendering? It’s basically about rendering a javascript application (in this case React) and turn it into static HTML with pre-populated data or content on the server.
I still didn't get it. Can you provide the difference between Client-Side Rendering and Server-Side Rendering? On client-side rendering, we are completely running React on the browser. The initial HTML that sent by the server just a placeholder (as you see above, just a div with an id of root), and the entire UI or content is rendered in the browser once all the scripts load.
Razzle
You probably already know what create-react-app is, a tool (built by developers at Facebook) that helps us to start creating our React project without to worry about configuration stuff. All we have to do is simply run the create-react-app command, then magically react app is ready to be developed. We start developing our project with amazing developer experience with features like HMR, ES6, CSS, CSS Modules, SASS/SCSS, Minify ours CSS, autoprefixes, and along with other features.
Now, Razzle, you have no idea about it. Razzle is just like create-react-app. But here's the difference, Razzle is a tool to create server-side rendering (React and React Router by default) app.
Let's quote what razzle is in their docs:
Razzle is a tool that abstracts all complex configuration needed for SSR into a single dependency--giving us the awesome developer experience of create-react-app, but then leaving the rest of our app's architectural decisions about frameworks, routing, and data fetching up to us.
Whaaatttttt, that's amazing. But wait, there's more, we can customize Babel and Webpack razzle config, why do I mean by that? For example, we want to add code splitting for our React project using @loadable/component which needed to add a little bit configuration to webpack for Server-side rendering, with razzle this is a piece a cake. We just simply create a razzle.config.js file then we can start to extend razzle webpack configuration.
Razzle also comes with plugins just like gatsby do. What does that mean? For example, we want to use TypeScript to develop Razzle, there's a plugin for that. Need to add assets compression on production build? There's a plugin for that. Need to inline SVG as create-react-app did? There's a plugin for that. Didn't find the plugin you looking for? You can build one!
Note: You can see all the available plugin here.
The Code
Before jump to the code, we need to know the goals of the things that we build. Here are the goals of this app:
- Server side rendering React (Of course, it's Razzle)
- Add React Helmet for SEO
- Code splitting
- Remove unused CSS on Production build
- Add gzip and brotli compression on Production build
Let's jump to the code. To start Razzle project, basically the same way like using create-react-app, but with Razzle command.
# Note: npx comes with npm 5.2+ and higher
# Use this command to your command line tool
# The razzle-boilerplate name is up to you
# in this case I pick a name razzle-boilerplate
npx create-razzle-app razzle-boilerplate
Then we're ready to develop Server side rendering React app. Let's take a look on project directory that Razzle generated:
|-- public
    |-- favicon.ico
    |-- robots.txt
|-- src
    |-- App.css
    |-- App.js
    |-- App.test.js
    |-- client.js <- entry point of our React app
    |-- Home.css
    |-- Home.js
    |-- index.js <- entry point of our server
    |-- react.svg
    |-- server.js <- Our server (ExpressJS) configuration
|-- .gitignore
|-- package.json
|-- README.md
|-- yarn.lock
Now navigate to our active project directory, we can start development server using scripts yarn start or npm run start. After it finished bundle our code, we can open http://localhost:3000 on our browser to see our app. Here's how it looks like:
Let's check if it's really server side rendering by viewing the page source on our browser.
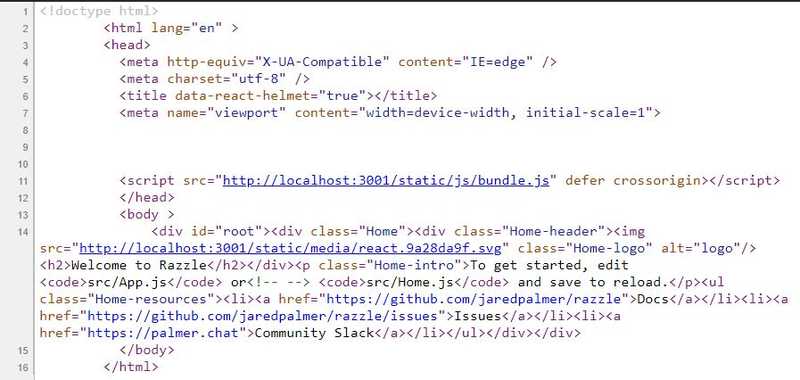
Well, as you can see, the code is there, not just a div with an id of root.
But you notice something, why there's so much unused space? Can we minify it? Of course, we'll use common-tags library to minify our html response.
Let's add it:
# If you're using yarn
yarn add common-tags

# If you're using npm
npm install --save common-tags
Now, open up our server.js again, and update our HTML template literals to use common-tags:
// server.js
import { html, oneLineTrim } from 'common-tags';
// Now update our response to use oneLineTrim
if (context.url) {
  res.redirect(context.url);
} else {
  res.status(200).send(
    oneLineTrim(      html`
        <!DOCTYPE html>
        <html lang="en">
          <head>
            <meta http-equiv="X-UA-Compatible" content="IE=edge" />
            <meta charset="utf-8" />
            <meta
              name="viewport"
              content="width=device-width, initial-scale=1"
            />
            ${assets.client.css
              ? `<link rel="stylesheet" href="${assets.client.css}">`
              : ''}
          </head>
          <body>
            <div id="root">${markup}</div>

            ${process.env.NODE_ENV === 'production'
              ? `<script src="${assets.client.js}" defer></script>`
              : `<script src="${assets.client.js}" defer crossorigin></script>`}
          </body>
        </html>
      `
    )
  );
}
Now, if we're inspecting the page source again, it will minify our HTML response like below:

Ok, we already checked the first point, next add React Helmet to our Project.
Add React Helmet
First, we need to install React Helmet, then use it on our server and client. To install React Helmet run the following command:
# If you're using yarn
yarn add react-helmet

# If you're using npm
npm install --save react-helmet
Now, open up our server.js file and add react helmet on our server route handler:
// server.js
import { Helmet } from 'react-helmet';
// Then we use it on our route handler
server
  .disable('x-powered-by')
  .use(express.static(process.env.RAZZLE_PUBLIC_DIR))
  .get('/*', (req, res) => {
    const context = {};
    const markup = renderToString(
      <StaticRouter context={context} location={req.url}>
        <App />
      </StaticRouter>
    );
    /**
     * Add helmet here
     * So that we can extract on our HTML template below
     * Notice on HTML below that we extract helmet
     * (title, meta, link and others) to string
     */
    const helmet = Helmet.renderStatic();
    if (context.url) {
      res.redirect(context.url);
    } else {
      // prettier-ignore
      res.status(200).send(
        oneLineTrim(
          html`
            <!DOCTYPE html>
            <html lang="en" ${helmet.htmlAttributes.toString()}>
              <head>
                <meta http-equiv="X-UA-Compatible" content="IE=edge" />
                <meta charset="utf-8" />
                ${helmet.title.toString()}
                <meta
                  name="viewport"
                  content="width=device-width, initial-scale=1"
                />
                ${helmet.meta.toString()}
                ${helmet.link.toString()}
                ${assets.client.css
                  ? `<link rel="stylesheet" href="${assets.client.css}">`
                  : ''}
              </head>
              <body ${helmet.bodyAttributes.toString()}>
                <div id="root">${markup}</div>

                ${process.env.NODE_ENV === 'production'
                  ? `<script src="${assets.client.js}" defer></script>`
                  : `<script src="${assets.client.js}" defer crossorigin></script>`}
              </body>
            </html>
          `,
        ),
      );
    }
  });
Ok, after we use it on our Server. Let's use it on our React Component. For this example, we'll update the title and meta description tag. Open Home.js file and then add the following code:
// Home.js
import { Helmet } from 'react-helmet';
function Home() {
  return (
    <div className='Home'>
      <Helmet>        <title>Welcome to Razzle Boilerplate</title>        <meta name='description' content='Web site created using create-razzle-app'>      </Helmet>      <div className='Home-header'>
        <img src={logo} className='Home-logo' alt='logo' />
        <h2>Welcome to Razzle</h2>
      </div>
      <p className='Home-intro'>
        To get started, edit <code>src/App.js</code> or <code>src/Home.js</code>{' '}
        and save to reload.
      </p>
      <ul className='Home-resources'>
        <li>
          <a href='https://github.com/jaredpalmer/razzle'>Docs</a>
        </li>
        <li>
          <a href='https://github.com/jaredpalmer/razzle/issues'>Issues</a>
        </li>
        <li>
          <a href='https://palmer.chat'>Community Slack</a>
        </li>
      </ul>
    </div>
  );
}
And voila! The title is updated! You can read more about React Helmet in here.
That's really easy, what about next, code splitting? Yep, let's jump to the next then.
Code Splitting
For code-splitting we are going to use @loadable/component. Let's install it then.
# For server side rendering
# @loadable/component required:
# 1. @loadable/server
# 2. @loadable/babel-plugin
# 3. @loadable/webpack-plugin

# If you're using yarn
yarn add @loadable/component @loadable/server
yarn add --dev @loadable/babel-plugin @loadable/webpack-plugin

# If you're using npm
npm install --save @loadable/component @loadable/server
npm install --save-dev @loadable/babel-plugin @loadable/webpack-plugin
Now, create a razzle.config.js in the root of our project so that we can extend the razzle webpack configuration and then add @loadable/component config.
Open up the file then add the following code:
// razzle.config.js
const path = require('path');
const LoadableWebpackPlugin = require('@loadable/webpack-plugin');
const LoadableBabelPlugin = require('@loadable/babel-plugin');
const babelPresetRazzle = require('razzle/babel');

module.exports = {
  modify: (config, { dev, target }) => {
    const isDev = dev === true;
    const isWeb = target === 'web';

    const appConfig = Object.assign({}, config);

    // Run client only
    if (isWeb) {
      const filename = path.resolve(__dirname, 'build');

      appConfig.plugins.push(
        new LoadableWebpackPlugin({
          outputAsset: false,
          writeToDisk: { filename },
        })
      );

      appConfig.output.filename = isDev
        ? 'static/js/[name].js'
        : 'static/js/[name].[chunkhash:8].js';

      appConfig.optimization = Object.assign({}, appConfig.optimization, {
        runtimeChunk: true,
        splitChunks: {
          cacheGroups: {
            commons: {
              test: /[\\/]node_modules[\\/]/,
              name: 'vendors',
            },
          },
          chunks: 'all',
          name: isDev,
        },
      });
    }
    return appConfig;
  },
  modifyBabelOptions: () => ({
    babelrc: false,
    presets: [babelPresetRazzle],
    plugins: [LoadableBabelPlugin],
  }),
};
Now, let's use it on our server. Open up the server.js file again and add the following code:
// server.js
import path from 'path';
import { ChunkExtractor, ChunkExtractorManager } from '@loadable/server';
server
  .disable('x-powered-by')
  .use(express.static(process.env.RAZZLE_PUBLIC_DIR))
  .get('/*', (req, res) => {
    const extractor = new ChunkExtractor({      statsFile: path.resolve('build/loadable-stats.json'),      entrypoints: ['client'],    });    const context = {};
    const markup = renderToString(
      <ChunkExtractorManager extractor={extractor}>        <StaticRouter context={context} location={req.url}>
          <App />
        </StaticRouter>
      </ChunkExtractorManager>    );
    const helmet = Helmet.renderStatic();

    if (context.url) {
      res.redirect(context.url);
    } else {
      // prettier-ignore
      res.status(200).send(
        oneLineTrim(
          html`
            <!DOCTYPE html>
            <html lang="en" ${helmet.htmlAttributes.toString()}>
              <head>
                <meta http-equiv="X-UA-Compatible" content="IE=edge" />
                <meta charset="utf-8" />
                ${helmet.title.toString()}
                <meta
                  name="viewport"
                  content="width=device-width, initial-scale=1"
                />
                ${helmet.meta.toString()}
                ${helmet.link.toString()}
                ${extractor.getLinkTags()}
                ${extractor.getStyleTags()}
              </head>
              <body ${helmet.bodyAttributes.toString()}>
                <div id="root">${markup}</div>

                ${extractor.getScriptTags()}
              </body>
            </html>
          `,
        ),
      );
    }
  });
Here you notice that our code has extractor, but what is it? Extractor is used to collect chunks server-side and it exposes an API to get them as script tags or script elements.
Note: You can see full list API here.
Let's continue, after we use it on the server, also update on client.js, and add the following code:
// client.js
import { loadableReady } from '@loadable/component';
/**
 * Wait for all loadable components to be loaded before rendering.
 * Beacuse Loadable components loads all our scripts asynchronously.
 */
loadableReady(() => {  hydrate(
    <Router>
      <App />
    </Router>,
    document.getElementById('root')
  );
});
And now we're ready to use code splitting on our React app. Let's use code splitting to our React app. Open the App.js file. Here, we are going to update how we import the Home component.
// App.js
import loadable from '@loadable/component';
// Before using code splitting (You can delete this)
import Home from './Home';
// After, and notice that we're using dynamic import syntax
const Home = loadable(() => import('./Home'));
Remove unused CSS
When we start developing our project, probably we decided to use CSS Framework to speed up our development. At first, it doesn't become a problem, then at some point, you realized that what CSS framework offers is too much, and you don't use it much. Maybe you just using the grid system, button, or maybe just the utilities. And you've been thinking, can I remove all that stuff that I don't use?
Well, guess what, you can! Here comes PurgeCSS, a tool to remove unused CSS. The way PurgeCSS works is, for example, we're using bootstrap on our project, we only using the class .container. Now, PurgeCSS will see that and will stripping all other CSS class that not being used, so in our final bundle CSS it will only have class .container.
Ok, enough talking, let's see PurgeCSS in action. First, we need to install some CSS Framework, I'll pick bootstrap. Let's install it:
# If you're using yarn
yarn add bootstrap

# If you're using npm
npm install --save bootstrap
Open up App.css and we're gonna import the bootstrap.
/* App.css */
@import '~bootstrap/dist/css/bootstrap.min.css';
And now use it on our Home.js component.
// Home.js
function Home() {
  return (
    <div className='container'>      <Helmet>
        <title>Welcome to Razzle Boilerplate</title>
      </Helmet>
      <div className='Home'>
        <div className='Home-header'>
          <img src={logo} className='Home-logo' alt='logo' />
          <h2>Welcome to Razzle</h2>
        </div>
        <p className='Home-intro'>
          To get started, edit <code>src/App.js</code> or{' '}
          <code>src/Home.js</code> and save to reload.
        </p>
        <ul className='Home-resources'>
          <li>
            <a href='https://github.com/jaredpalmer/razzle'>Docs</a>
          </li>
          <li>
            <a href='https://github.com/jaredpalmer/razzle/issues'>Issues</a>
          </li>
          <li>
            <a href='https://palmer.chat'>Community Slack</a>
          </li>
        </ul>
      </div>
    </div>  );
}
Let's build it on Production mode. We can use yarn build or npm run build to build for Production. After it finished, let's serve our app using yarn start:prod or npm run start:prod. Ok, but why you ask? Well, we gonna inspect how much bootstrap affect (size) in our Project.
Open http://localhost:3000 again in our browser. Let's inspect it and we're gonna use the network tab on chrome to see how much bootstrap cost.
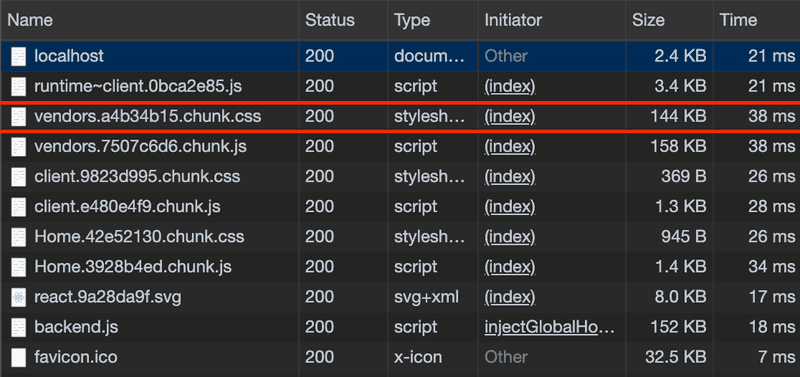
Now pay attention to the vendors CSS file, it's our bootstrap file. The size is 144kb, now you said, that small, well now think if our users are on a slow network, that's a lot to download. Besides it is too much because we only using the class .container, so why download all of it?
Luckily, PurgeCSS has a plugin for Razzle. Let's use it then:
# If you're using yarn
yarn add --dev razzle-plugin-purgecss

# If you're using npm
npm install --save-dev razzle-plugin-purgecss
Wait a minute, how to use the plugin on Razzle? Well same as when we're adding @loadable/component, using razzle.config.js. Now open up our Razzle config file, then add PurgeCSS as a plugin:
// razzle.config.js
module.exports = {
  plugins: [    {      name: 'purgecss',      options: {        // This path options is required for PurgeCSS to analyzed all of our content        path: path.resolve(__dirname, 'src/**/*'),      },    },  ],  modify: (config, { dev, target }) => {},
};
Now let's build again for Production and inspect it.
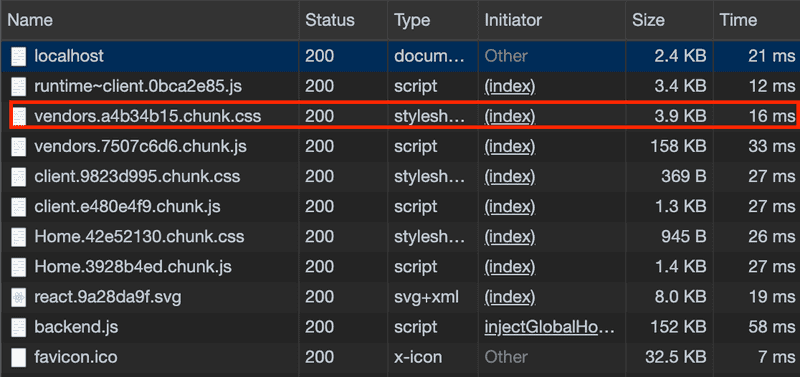
Now, pay attention again to our vendors CSS file. It only 3.9kb! Holy molly cow, it reduces 97% the size from original size. Wowww that's amazing! Now our CSS bundle is not bloated with unused code, also we help our user to download as small as possible file which will save their data plan (less download, less data plan being used) when they visit our website (even tho they didn't know that).
Compression
Here comes the last part, why should we compress all our assets? Here's why quoted from web.dev:
Compressing files can significantly improve the performance of a webpage.
Why? Because with compression, all of our assets file size will be much smaller! Remember that we have to send it to user as small as possible.
Before adding compression to our project. Let's check how our project size overall.
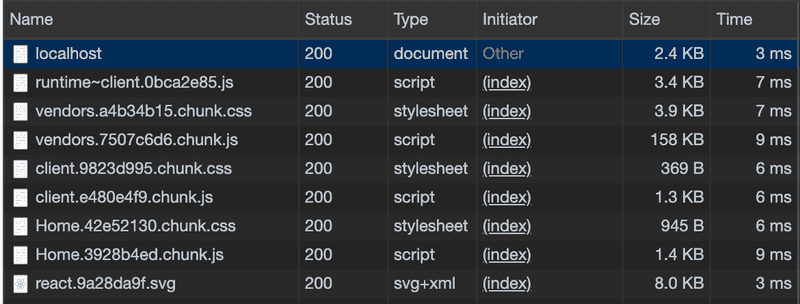
We're going to use razzle-plugin-compression to add compression. It provides static compression for gzip and brotli. Also, we need compression and express-static-gzip to serve gzip and brotli on our server.
# If you're using yarn
yarn add compression express-static-gzip
yarn add --dev razzle-plugin-compression

# If you're using npm
npm install --save compression express-static-gzip
npm install --save-dev razzle-plugin-compression
Open our razzle.config.js again to use the compression plugin:
// razzle.config.js
module.exports = {
  plugins: [
    {
      name: 'purgecss',
      options: {
        path: path.resolve(__dirname, 'src/**/*'),
      },
    },
    {      name: 'compression',      options: {        brotli: true,        gzip: true,        compressionPlugin: {          filename: '[path].gz[query]',          algorithm: 'gzip',          test: /\.(js|css|html|svg)$/,          compressionOptions: { level: 9 },          minRatio: 0.8,        },        brotliPlugin: {          asset: '[path].br[query]',          test: /\.(js|css|html|svg)$/,          minRatio: 0.8,        },      },    },
  ],
  modify: (config, { dev, target }) => {},
};
Now every time we build for Production, it will generate a gzip and a brotli file. But this is not enough. We also need to set our server to serve gzip and brotli. Let's open our server.js file:
// server.js
import compression from 'compression';import expressStaticGzip from 'express-static-gzip';
server
  .disable('x-powered-by')
  .use(compression())  .use(    expressStaticGzip(process.env.RAZZLE_PUBLIC_DIR, {      enableBrotli: true,      orderPreference: ['br', 'gz'],    })  )  .get('/*', (req, res) => {
    const extractor = new ChunkExtractor({
      statsFile: path.resolve('build/loadable-stats.json'),
      entrypoints: ['client'],
    });
    const context = {};
    const markup = renderToString(
      <ChunkExtractorManager extractor={extractor}>
        <StaticRouter context={context} location={req.url}>
          <App />
        </StaticRouter>
      </ChunkExtractorManager>
    );
    const helmet = Helmet.renderStatic();

    if (context.url) {
      res.redirect(context.url);
    } else {
      res.status(200).send(
        oneLineTrim(
          htmlTemplate`
            <!doctype html>
            <html lang="en">
            <head>
              <meta http-equiv="X-UA-Compatible" content="IE=edge" />
              <meta charset="utf-8" />
              ${helmet.title.toString()}
              <meta name="viewport" content="width=device-width, initial-scale=1">
              ${helmet.meta.toString()}
              ${helmet.link.toString()}
              ${extractor.getLinkTags()}
              ${extractor.getStyleTags()}
            </head>
            <body ${helmet.bodyAttributes.toString()}>
              <div id="root">${markup}</div>

              ${extractor.getScriptTags()}
            </body>
            </html>`
        )
      );
    }
  });
And we're done. Let's check again how much we improve and saving delivering bundle size to users.
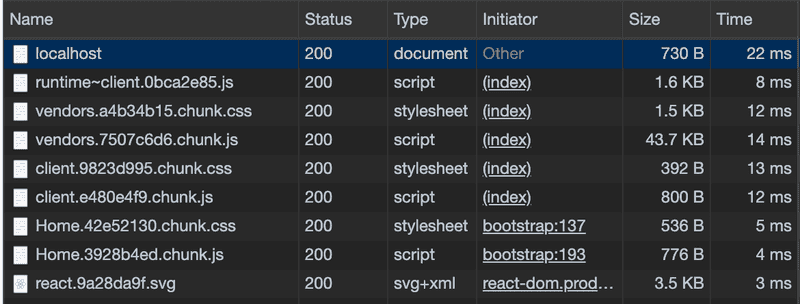
Did you notice any difference? Well, take a look at the size. It improves so much, all the response sizes now much smaller than before. For example, our vendors JS file, before it gets compressed, the file size is 158kb, now after all our assets get compressed, the size is only 43.7kb. What a save!
Again, we improve the performances and we help our user saving so much their data plan every time visit our website because we always send our assets as small as possible.
Now, we reach the end of the tutorial. In my opinion, Razzle really helps to set up Server-side rendering React app with ease. It also gives us the freedom to customize our app like customize the webpack or babel configuration to do whatever we want!
So, what do you think about Razzle?
Was this article helpful? Share it on:


Personal notes by Fin Mavis.
As a reminder to my future self while learning.